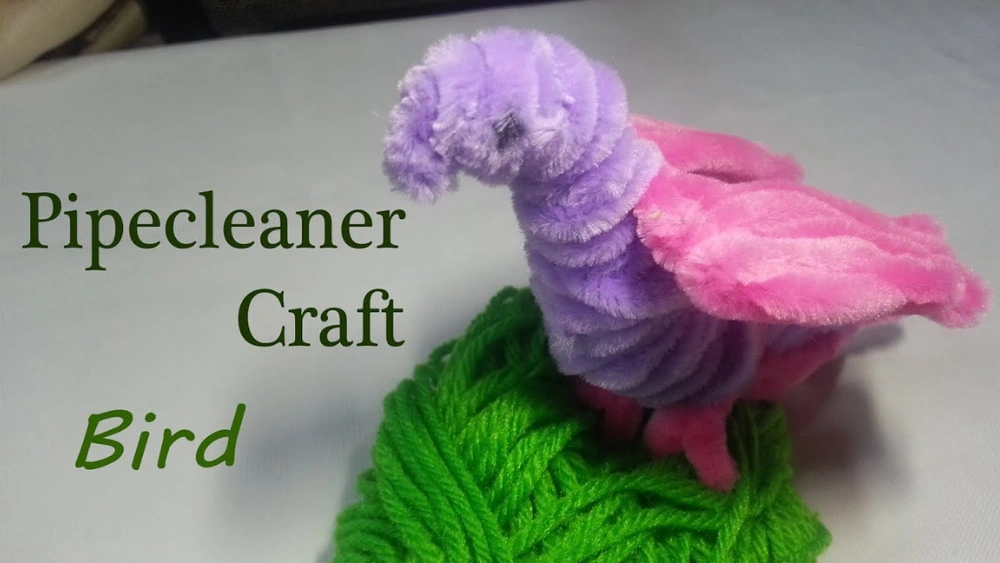
Imagine creating a charming little bird that balances effortlessly on your fingertip, using just a few simple materials. Sounds intriguing, right?
Making a pipe cleaner balancing bird is not only a fun craft project but also a delightful way to explore the wonders of balance and physics. With just a handful of items and a pinch of creativity, you can craft a playful bird that will amaze your friends and family.
Whether you’re looking for an educational activity for your kids or a relaxing DIY project for yourself, this guide will show you exactly how to bring your balancing bird to life. So, are you ready to spark your creativity and engage in a craft that’s as educational as it is entertaining? Keep reading to discover how you can make your very own pipe cleaner balancing bird!
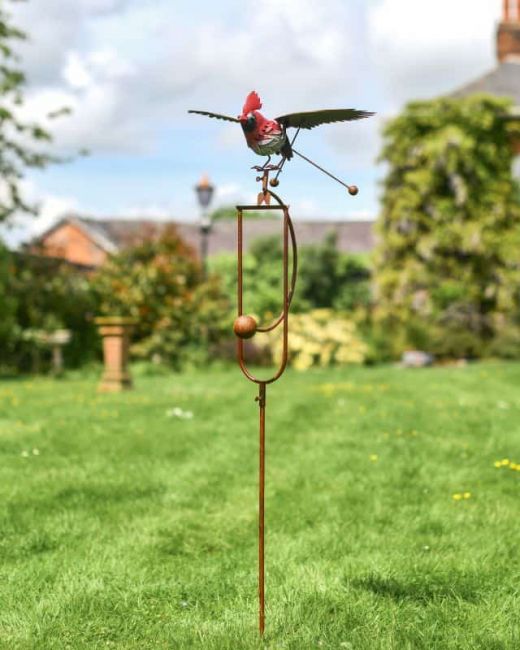
Credit: www.blackcountrymetalworks.co.uk
Materials Needed
Gathering the right materials is key to making a pipe cleaner balancing bird that not only looks good but also balances perfectly. You don’t need fancy or expensive supplies to create this fun craft. Most items are easy to find around your home or local craft store.
Having everything ready before you start saves time and keeps your project smooth. Plus, it helps you focus on the creative part instead of scrambling for missing pieces. Let’s take a close look at the materials you’ll need to bring your balancing bird to life.
Pipe Cleaners
Choose colorful pipe cleaners as the main building blocks for your bird. They are flexible, easy to shape, and hold their form well. Pick at least two or three colors to make your bird more vibrant and eye-catching.
Plastic Straw Or Skewer
A lightweight plastic straw or a wooden skewer acts as the bird’s balancing beam. This piece is crucial because it helps your bird find its balance point. You can experiment with different lengths to see what works best for your design.
Small Beads Or Buttons
Use small beads or buttons to add weight and detail to your bird. These act as the bird’s eyes or decorative accents and help in balancing the craft. Choose items that are small and light enough not to weigh down the bird too much.
Glue Or Tape
Strong glue or clear tape holds everything together securely. While pipe cleaners can twist together, some parts need extra reinforcement. Pick a glue that dries quickly and is safe to use on craft materials.
Scissors
A sharp pair of scissors is essential for cutting pipe cleaners and straws to the right size. Make sure they are easy to handle, especially if you’re crafting with kids. Safety scissors work well for younger crafters.
Marker Or Pen
Use markers or pens to add facial features or decorate your bird further. Simple dots for eyes or small patterns can bring personality to your creation. This small touch can make your balancing bird truly unique.
Step-by-step Assembly
Assembling your pipe cleaner balancing bird requires focus and a bit of creativity. Each part of the bird plays a role in its balance and charm. Let’s break down the process into clear, manageable steps so you can enjoy crafting without frustration.
Shaping The Pipe Cleaners
Start by selecting pipe cleaners in colors you like for your bird. Bend one pipe cleaner into a gentle “S” shape; this will form the main frame. Twist the ends slightly to create small loops—these loops help with attaching other parts later.
Try to keep the bends smooth and even. Have you noticed how the bird’s balance depends on symmetrical shapes? Take your time shaping the pipe cleaner to ensure stability.
Creating The Bird Body
Use a second pipe cleaner to wrap around the frame you just made. Coil it tightly around the middle section to form a plump body. Make sure the coils are snug but not so tight that the pipe cleaner loses its flexibility.
Adjust the body’s size to match the frame—too big and the bird may tip over, too small and it won’t look right. How does the thickness of your body affect the bird’s ability to balance? Experiment with different amounts of wrapping.
Adding The Wings And Tail
Take two short pipe cleaners for the wings. Fold each one in half and twist the ends to create small loops, then attach them on each side of the body by twisting around the frame. For the tail, use a longer piece, fan it out by bending it into several small strips, and attach it to the back.
Wings and tail aren’t just decoration—they help with balance. Have you noticed how adjusting the wing’s angle changes the bird’s posture? Play with their position until your bird stands steady.
Attaching The Beak And Eyes
For the beak, cut a tiny piece of an orange or red pipe cleaner and fold it into a small triangle. Attach it to the front of the bird’s head by twisting the ends around the frame. Use small beads or glue on tiny googly eyes to give your bird character.
Adding the eyes and beak last lets you see how the bird looks before final touches. Does your bird look curious or proud? Small details make a big difference in bringing your creation to life.
Balancing Techniques
Balancing a pipe cleaner bird requires a careful touch and understanding of weight distribution. The key lies in adjusting parts of the bird until it stands perfectly balanced. Small changes can make a big difference in how well the bird stays upright. Focus on the center of gravity and wing and tail positions to achieve balance.
Finding The Center Of Gravity
The center of gravity is the point where the bird balances evenly. To find it, gently place your bird on a thin edge like a pencil or a finger. Move the bird slowly until it stays steady without tipping. This spot is the center of gravity. Try shifting the body or head slightly to move the center if needed.
A balanced center means the bird will not fall easily. This step helps in making the bird stable and able to balance for a longer time.
Adjusting The Wings And Tail
The wings and tail act like counterweights. Bend the wings up or down to change their weight effect. Adjusting the tail angle can also help balance the bird. If the bird tips forward, lift the tail slightly. If it falls backward, lower the tail or bend the wings forward.
Make small changes and test the balance after each adjustment. This process ensures the bird stays upright and looks natural.
Credit: www.youtube.com
Creative Variations
Adding creative variations to your pipe cleaner balancing bird can make the crafting process more enjoyable and the final product truly unique. Small changes in color and decoration can transform a simple bird into a vibrant, eye-catching piece. Let’s look at some ways you can personalize your balancing bird to reflect your style and imagination.
Using Different Colors
Choosing a variety of colors can bring your balancing bird to life. You might want to use bright, contrasting colors to make the bird stand out or softer, blended tones for a more subtle look.
Try mixing metallic pipe cleaners with classic colors to add an unexpected shine. Have you ever thought about matching your bird’s colors to your room’s decor or a favorite outfit? This can make your creation feel more connected to your world.
Don’t be afraid to combine multiple colors in one bird. For example, use one color for the body, another for the wings, and a third for the beak. This layered approach adds depth and makes your bird look more dynamic and interesting.
Adding Decorative Elements
Beyond colors, you can add small decorative pieces to enhance your pipe cleaner bird. Beads make excellent eyes or accents along the wings. They add texture and catch the light in a way pipe cleaners alone cannot.
Another idea is to glue tiny feathers or sequins onto the bird. These elements add a realistic touch and invite you to experiment with different materials. Have you considered using a little bit of craft glue and glitter to make your bird sparkle?
Think about attaching a small bell or charm at the tail or wing tips. This not only decorates your bird but also adds a playful sound when it moves. What kind of personality will your bird have with these added touches? Your choices here can tell a story.

Credit: www.youtube.com
Frequently Asked Questions
What Materials Are Needed For A Pipe Cleaner Balancing Bird?
You need pipe cleaners, a small bead, scissors, and a sturdy base. These simple items help create a fun balancing bird craft.
How Do You Balance The Pipe Cleaner Bird Perfectly?
Adjust the bead position and bend the wings slightly. Fine-tune until the bird balances steadily on a finger or edge.
Can Children Safely Make A Pipe Cleaner Balancing Bird?
Yes, it’s a kid-friendly craft. Adult supervision is recommended for cutting and handling small beads.
How Long Does It Take To Make The Balancing Bird?
It usually takes about 10 to 15 minutes. This makes it a quick and enjoyable craft project.
Conclusion
Making a pipe cleaner balancing bird is fun and simple. You can create one with a few supplies and steps. This craft helps improve focus and hand skills. It also shows basic physics in action. Kids and adults enjoy watching the bird balance and move.
Try different colors and shapes to make it unique. Keep practicing to get the perfect balance. This project brings joy and learning together. Give it a try and see your bird come to life!