Imagine sipping your morning coffee while watching vibrant birds flutter around your backyard. It’s a scene of pure tranquility and nature at its finest.
But how do you attract these feathered friends to your garden? The answer is simple: a homemade wooden bird feeder. Creating your own bird feeder not only saves money but also allows you to customize it to match your outdoor decor.
Plus, there’s a special joy in knowing that the birds visiting your garden are enjoying something you crafted with your own hands. In this guide, you’ll discover the step-by-step process to make a beautiful and functional wooden bird feeder. Stick around, and you’ll be ready to start attracting a variety of birds to your yard. Let’s get started!
Choosing Materials
Choosing the right materials is key to building a strong and lasting wooden bird feeder. The materials you pick affect how well your feeder holds up outside. Wood type, tools, and supplies all play important roles in the project. Careful selection makes the building process smoother and the final product better.
Selecting The Right Wood
Wood must be safe for birds and resist weather. Cedar and redwood are popular choices. Both woods resist rot and last long outdoors. Pine is cheaper but may need extra protection with paint or sealant. Avoid treated wood because chemicals can harm birds.
Choose wood that is smooth or sand it well. Rough wood can hurt birds or cause splinters. Pick boards that are straight and free from cracks. The thickness should be around ½ to ¾ inch for strength and ease of cutting.
Gathering Tools And Supplies
Good tools make the job easier and safer. Essential tools include:
- Saw for cutting wood pieces
- Hammer and nails or screws
- Drill with bits for making holes
- Measuring tape and pencil
- Sandpaper or electric sander
Besides tools, gather supplies like wood glue and non-toxic outdoor paint or sealant. These help hold the bird feeder together and protect it from rain and sun. Choose paint labeled safe for wildlife to keep birds healthy.

Credit: www.youtube.com
Cutting And Preparing Wood
Cutting and preparing wood is a crucial stage in making a wooden bird feeder. The accuracy of your cuts affects the feeder’s stability and appearance. Taking your time to measure correctly and cut safely will save you from headaches later on.
Measuring And Marking Pieces
Start by carefully measuring the wood pieces you need. Use a reliable tape measure and double-check each measurement before marking. Mark the wood clearly with a pencil or chalk, making straight lines to guide your cuts.
Think about how each piece will fit together. Are your measurements matching the design you have in mind? Precise marking helps avoid gaps or awkward fits that can scare away birds or let rain inside.
- Measure twice to avoid mistakes.
- Use a square tool to get perfect right angles.
- Label each piece to keep track of its place in the feeder.
Safe Cutting Techniques
Safety should be your top priority when cutting wood. Always wear protective gear like goggles and gloves to protect yourself from dust and sharp edges. Secure the wood firmly with clamps to prevent slipping during the cut.
Choose the right saw for your project. A handsaw works well for small cuts, while a jigsaw or circular saw is better for more complex shapes or larger boards. Cut slowly and steadily, following your marked lines carefully.
- Keep your fingers clear of the blade path.
- Work in a well-lit area for better visibility.
- Take breaks if you feel tired to maintain focus.
Have you ever rushed through cutting wood only to find the pieces don’t fit? Taking the time to measure carefully and cut safely can make your bird feeder project more enjoyable and successful.
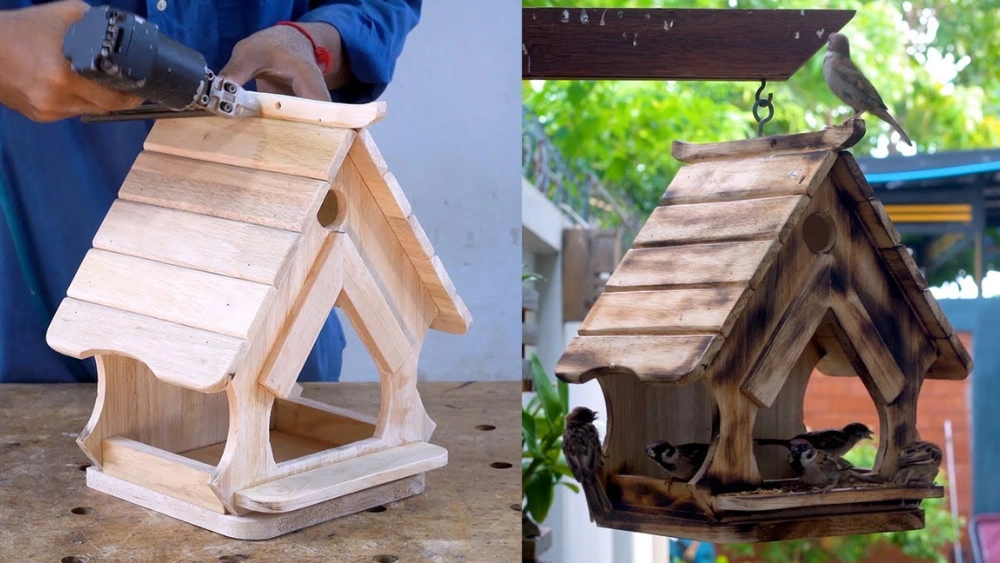
Assembling The Feeder
Assembling your wooden bird feeder is where your project truly takes shape. This stage brings together all the carefully cut pieces of wood and sets the foundation for a safe and inviting spot for birds. Paying attention to the details now will make your feeder sturdy and functional for seasons to come.
Joining Wood Pieces
Start by lining up the wood pieces according to your design. Use wood glue along the edges to create a strong bond before nailing or screwing them together. This double layer of attachment prevents wobbling and enhances durability.
Clamps can be a huge help here, holding parts tightly while the glue dries. Make sure edges meet flush to avoid gaps where water can seep in. Have you noticed how a simple misalignment can affect the whole structure’s stability?
Adding Bird-friendly Features
Think about what birds need to feel comfortable visiting your feeder. Adding a small perch allows them to land easily, while a roof overhang protects the food from rain. You can attach a shallow tray or platform to catch spilled seeds and make cleaning easier.
Consider drilling drainage holes in the base to prevent water buildup. Birds appreciate feeders that stay dry and clean—it keeps their food fresh longer. What small touches could you add to make your feeder more inviting?

Credit: www.youtube.com
Finishing Touches
Finishing touches give your wooden bird feeder a polished look and protect it from weather damage. These steps make the feeder safe and durable for outdoor use. Spend time on these details to ensure your bird feeder lasts through many seasons.
Sanding And Smoothing
Start by sanding all surfaces with medium-grit sandpaper. This removes rough edges and splinters. Follow with fine-grit sandpaper for a smooth finish. Pay special attention to corners and edges where birds might perch. Smooth surfaces prevent injuries to birds and make the feeder look neat.
Applying Protective Coating
Choose a non-toxic, water-resistant finish to protect the wood. Options include outdoor wood sealant or natural oil like linseed oil. Use a brush to apply an even coat over all surfaces. Let the first coat dry completely before applying a second. This layer protects the wood from rain and sun. It also helps keep the feeder clean and safe for birds.

Credit: www.youtube.com
Frequently Asked Questions
What Materials Do I Need To Make A Wooden Bird Feeder?
You need wood planks, nails or screws, wood glue, sandpaper, paint or sealant, and basic tools like a saw and drill. Choose untreated wood to keep birds safe and ensure durability outdoors.
How Do I Protect The Wooden Bird Feeder From Weather?
Apply a non-toxic, water-resistant sealant or outdoor paint. This prevents water damage and wood decay. Reapply the sealant yearly to keep the feeder durable and bird-safe.
What Wood Type Is Best For Bird Feeders?
Cedar, pine, and redwood are ideal. These woods are naturally weather-resistant and safe for birds. Avoid treated wood with chemicals that can harm birds.
How Do I Attract Birds To My Wooden Feeder?
Fill the feeder with seeds like sunflower or millet. Place it in a quiet, shaded spot near trees or bushes. Clean the feeder regularly to keep birds healthy.
Conclusion
Building a wooden bird feeder is a fun and simple project. It brings birds closer to your home. You can enjoy watching them every day. Using basic tools and wood makes it easy. This project also helps nature and the environment.
Start with small steps and learn as you go. Soon, your garden will be full of happy birds. Give it a try and see the joy it brings. Simple, useful, and rewarding. A great way to connect with nature.